ANIMATICS
- Apr 4, 2017
- 7 min read
So it's been a busy new year for me and as a result I haven't been the best blogger recently. I'm hoping you can forgive me in light of the very cool things I have to show you now!
Anyway. I completed some animatics for my film somewhere around Christmas time and I've been keeping them all to myself since then.
I decided to break the film down into 4 scenes. It made the most sense. They roughly split the narrative up into the following moments:
Crash sequence - Equilibrium and disruption.
Wake up - Realisation
Trying to remember/remembering - Restoration
Conducting on the planet - Equilibrium returned.
So to make my life easiest I broke the storyboards down into these sections and then created the animatic in those sections. But I wont bother breaking it down like that for everyone here. It's just really to explain why you'll see some inconsistancies in style, brushes and textures. I didn't write them down at the time because I hadn't made any set decisions. And at the point of making was still convinced this film was going to be a stop motion so it wasn't really going to matter too much. if I had the motions entirely figured out. Since then I have made the much better decision to make a 2D digital animation instead. That's just something to keep in mind when you're watching the animatic.
Anyway here's the animatic for you. The password is EIFF2017
ANIMATIC
So when I made this version I made it specifically for a stop motion film. Which is proving not hugely helpful now that I'm actually trying to animate the whole thing and I'm having to do a lot of the work I should have done at this stage again now. I wish I had taken slightly longer to think through and figure thing out in regards to some of the more complex movements. But hindsight is a brilliant thing, right?
It's not all too bad though because I did record a good number of visual references for myself. Most of them are variations of me doing the things I needed Lute to do and some are collected from elsewhere on the internet. Some things like head shaking, I was finding difficult to act myself because I was over complicating them. I believe I already shared some of my visual referencing with you but rest assured there is a whole folder on my laptop with these things in them.

Returning to talking about my animatic however, the things I did notice were that I did not get bored or find my attention waning when I watched my animatic back (which I do all the time). I find myself engaged with it. Admittedly I'm finding it hard to tell if that's becasue I've worked really hard on it and it's my film or if it's becasue it's genuinely engaging but I like to think it's engaging. Mostly because if I made it and I still want to watch it, it's gotta be interesting, right? If I'm not sick of it yet, I'm taking that as a really good sign.
So the important things to an animatic are obviously pacing, key frames and composition. So I'm going to talk about each of those here now.
pacing-
I've always struggled with pacing in animatics. I think a lot of that is becasue I could never find a good software for animaticing in. However, these last two years I've been working on my drawing skills in 2D softwares like photoshop. I previously used flash to animate my animatics but since adobe changed it to animateCC I haven't been able to use it in the same way. I taught myself to animatic in photoshop instead, as I was already teaching myself to draw in it so it seemed like a natural extension. For the first time I felt like I had good control over my animatic. My timings were good and my drawings were clear. Now as I am making the final film I am noticing that I am making few changes were pacing is concerned. Which is new for me. Usually I'm loosing/gaining around 33% of the original length between animatic to final edit. Yet this time my timings seem to be matching.
I think another factor of difference this time is that I allowd my animatic to breath. I didn't ever know what that meant when other animators or Alan told me to let something breath but I decided to take it to mean leave a break. So I held my pauses for longer, let a keyframe hold for longer and assume that anyone else watching it isn't going to have things figured out so quickly so I might as well take things slow. And I really think that helped my pacings consistancy.
At animatic stage my film is 5:45 in length (without credits) which, I'll admit scared me to begin with. However a dedicated and well thought out work ethic means that I have been steadily making my way through the work and I'm feeling confident about the animations completion.
KEY FRAMES -
So, I previously admitted I maybe didn't key frame every motion as rigerously as I would have done if I'd known I was going to be animating this in a hard drawn style. If I had I might have bothered to figure things out a bit better, but you can't change the past, live and let live, let is go people. But even thought I didn't key frame as well as I could have done, the key framing I did do is fairly strong (I feel).
When I first started at ECA my drawing skills were not the strongest but 4 years of practice has really strengthened my ability to draw as well as my speed as an illustrator. It's meant that figuring out key frames has become logistically a lot easier than before.
I also made full use of the aforementioned reference bank. I broke a lot of those motions down to the points where the actions changed and their more important passing points so that I could map them easily enough in the animatic.
With this film I tired to input a few more unusual angles and forced perspective shots that would make a film set in limited setting a bit more interesting. Which added another key framing element while making the animatic. I had to think about perspective shots in order to make things feel realistic. Some of the forced perspectie shots are still tripping me up now but it's much more interesting that simple angles and shot types.
COMPOSITION-
I did a lot of my compositing in storyboard format during the earlier pre production stages however the animatic presented me with an oportunity to check some of my chosen staging when movement was introduced.
I found that a large amount of my opening sequence needed reworked from storyboard to animatic. Lute stayed in the same sort of area within the frame, he sits upon the golden ration, however, a lot of the elements around him felt wrong and so they were reworked 3 times in my various animatic types before I was happy with what was happening.


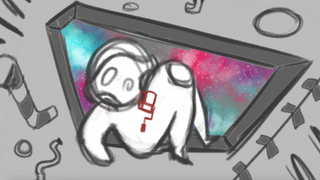
The above screen shots are from the three different kinds of animatics I made whilest trying to figure the first sequence out.
To begin with I had the shots close up and tight to the camera because I wanted it to feel like the audience was experiencing things at the same time as Lute was. I also wanted it to be confusing for the audience just like it would be for Lute. However, this might have worked at a static storyboard level but it didn't work once I began to make things move. The angles were too tight and what was meant to be confusing but still interpretable was definitely far more confusing than that and it was difficult to tell what was happening at all. Not a great way to start a film off.
So in the second version I tried implimenting the recurring use of his POV shots. I knew these were important to the sound design later on in the film and that lead me to think I should maybe bring it in earlier on in the film so it's established and the audience know to expect it. It also let me use some more unusual shot types that I had been hoping to use the first time around. But alas, this was almost worse. It seemed like a good idea but when I animaticed it and watched it back it was ugly and clunky and above all else unconvincing. There aren't enough nuences in a spacesuit to make that kind of shot angle feel believable. Otherwise it was just two white suasages and a rectangle bobbing about in weightless space. None of which was going to convince anyone of anything. Needless to say I threw away this composition as well.
To finish, I decided to take things with a slightly more realistic flair and began to look at how airplanes crashed so I could far more closely relate to real weightlessness crashing. I looked pretty closely at the crash sequences from Lost because I remembered them to be very convincing and very realistic.
From this I realised that there are three different moving factors that contribute to a crash. Object and character movement, vehicle movement and camera movement. Each of these elements moves independently of one another and created a convincing crash. So to make my crash feel real I decided to compose the shot in a way that meant you could clearly see all of these elemts working. So I picked a wide shot so I could get it all in. I feel like while it's not the most interesting of shots, it's the one out of the three that worked the best.
I think that pretty much wraps up my animatic considerations. So thanks for sticking this post out all the way to the end! It was a pretty lengthy one.


Comments